a visual experiment.

a visual experiment.

Tuesday 16 February 2016

Cleaning the glass on Epson v700.

Today, as I was scanning some of my glass plates, the thin film of mould on the underside of the scanner glass which I had been trying to ignore for months has finally found its way into my scans.

Dirty scans from my V700 - Notice the blue streaks converging to my face?

I am not too sure if the humidity of tropics caused the film to form, but the problem seems to find its way back to my scanner every few months. When I first experienced this issue, I brought my scanner back to Epson and they quoted me an arm and a leg to disassemble and clean the glass. I decided against it and went home to see if I could fix it on my own.

To be honest, I was initially very nervous about dismantling the scanner for fear of damaging it, but this is easy enough that I do it every now and then when the streaks appear in my scans. To clean your V700:

1. Lock both the main and transparency units as per instruction manual.

2. Remove all connecting cables on the main scanner unit.

3. Lift and remove the top lid.

4. Using a sharp pin or screwdriver, pry open the 4 circular plugs around the scanner to reveal the screws.

5. Remove the screws using Phillips screwdriver.

6. Gently lift the top part of the main scanner unit, taking extra care not to break the hinge in the front.

7. To clean, dampen a piece of cotton ball with ethanol and wipe in a systematic manner to leave minimal residue.


Final scan after cleaning - with minor adjustments in Photoshop.
And there you have it, a clean surface for scanning on your V700.

Hope this helps!

Thursday 10 December 2015

Should I shoot expired film?

The advantages of shooting expired film is obvious - its cheap. As we move towards digital workflow many film labs and professional studios have been throwing out their expired film or letting them go for cheap - but is it worth the trouble?

All undeveloped film will eventually change over time, losing contrast and colour balance. Storing it in hot and humid conditions accelerate this process, while refrigerating it slows it down and freezing stops it.

Storing your films in an old fridge from a thrift store is a good way to protect your investments.

The reason for film manufacturers to indicate an expiry date or more accurately a "process before" date is that most film sold in retail stores are stored in room temperature. This date is often 2 years from manufacture and is a conservative number as film manufacturers would have to assume a large variation of storage conditions by the retailers. However, in most cases, the process before date is usually months before visible degradation is seen. The fact is you still can get excellent images from expired films unless they are stored warmer than room temperature for an extended time.

So, to answer the age old question - how old is too old? Well, to be honest, there is no definite answer to that, but if you have film that has just expired for a week or two, don't toss it as it should be good as new. If you have anything older, colour shifts and increased grain may be evident, but go ahead and do a test roll and see if you like the results. In fact, some photographers are looking for expired films for its dreamy and surreal effects.

Call me lucky as I have been constantly getting good results with expired films, but luck isn't the main reason that has contributed to my success in using them. Most of the expired film that I have used were been bought fresh and kept in a freezer or fridge. These were the old Kodak Portra, Kodak Ektachrome and Fuji Reala which were bought just before production stopped.

Occasionally, I would be presented with an opportunity to acquire a lot of expired film for close to nothing. While its tempting to snag the deal immediately, I would try to get to know the seller better and check on how the film was stored before buying it.

A shot from expired but cold stored Fuji Superia 200. 

More than often, expired films from professional photographers and major photographic suppliers are refrigerated and tend to be more consistent. So if you have to buy expired film either for cost savings or for a particular discontinued emulsion, your best bet is to check out B&H and Adorama where they sell 'short-date' specials or check out my store for some hard to find emulsions.

Some tips of shooting expired film:

  • Always shoot a test roll before shooting anything significant.
  • Overexpose the film to compensate for lower sensitivity.
  • Keep them in cold and dry conditions to reduce further deterioration. 
  • Don't research on the effects of a particular expired film. Unless they are acquired from the same batch and stored in the same condition, they are likely to be different.

From the same roll - also looking good.

Well, to answer if its worth the time and money to shoot expired film, my answer would really depend on your needs and taste. If consistency is of utmost importance to you, your safest bet is definitely buying fresh film from the major retailers. But if you are looking for a particular discontinued emulsion, take my advice above and check on the history of where the film is stored. This will give you a good indication if the film is still good for use.

Cheers and enjoy shooting film.


Thursday 3 December 2015

Camera Review: Voigtlander Vitessa

Voigtlander Vitessa - A beautiful 35mm compact folder.

The Vitessa is an interesting 35mm folding rangefinder produced by Voigtlander in the 1950s. With its underlying design principle "built into your hands", the camera introduced several innovations unusual for its time and genre to help photographers be more efficient at photo taking.

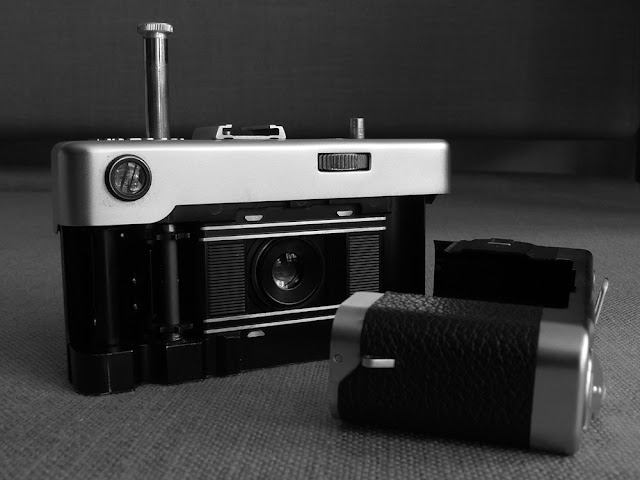
One of the most striking feature you will realise in the Vitessa is the lack of a film advance lever or winder. In its place, a long rod that looked like an antenna of an early 80s cellphone which Voigtlander calls "Combi-Plunger". By fully depressing the Combi-Plunger, you would advance the film and ready the shutter. To stow for transportation or storage, press the Combi-Plunger 90% of its way down.

Voigtlander Vitessa with rear cover removed. Focusing knob is seen just below the shutter release.
Focusing a Vitessa is made very easy by the focusing knob located at the right side of the top plate and is in easy reach the user's right thumb. It takes about 3 to 4 swipes to go across the whole focus range, allowing quick focus between 1m and infinity.


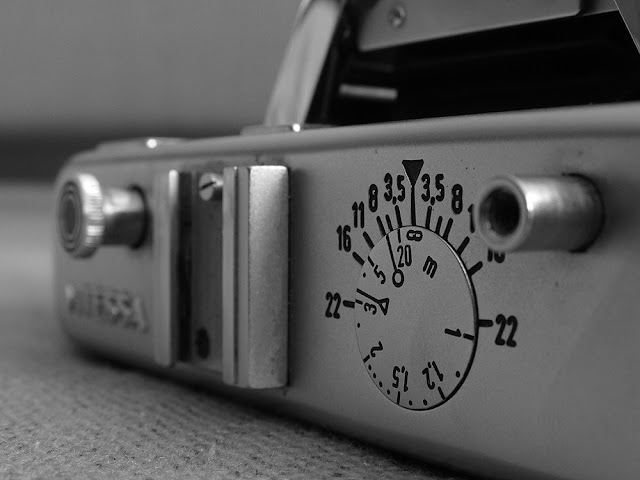
The DOF scale with a round rotating focus scale. 
Accompanying the focus knob is a rather unique DOF scale. As one turns the focusing tab, a round disc rotates with the corresponding focus distance. I find this much more useful than the traditional DOF scale on the lens barrel if you are planning to shoot by the hip. If shooting by the hip is not your cup of tea, you will be pleased to know that the viewfinder is parallax corrected, allowing precise framing.


The Color Skopar 50/3.5 lens and the EV scale. Other variations include: Color Skopar 50/2.8 and Ultron 50/2.8
The Vitessa uses EV or Exposure Value settings, a system popular in the late 1950's. Once an exposure combination is set, that combination of equivalent f/stops and shutter speeds remains set until the user pushes down the combination EV lock/aperture lever to select another setting. In other words, if you set f/16 at 1/125, moving the shutter speed to 1/250th automatically moves the f/stop to f/11. This allows quick change of aperture and shutter speeds if shooting under the same lighting.


Size comparison of the Vitessa.
As for size, the Vitessa is fairly compact. When its lens recessed, the Vitessa is just slightly smaller in size as compared to the Leica Ms. In a pinch, you might be able to fit it into the pocket of your coat, if you don't mind the weight (approx 670g).


The Vitessa shows a superb, almost Leica quality fit and finish as seen here in detail.
I''m sure you already know that Voigtlander makes awesome modern rangefinder lens (though manufactured by Cosina) and I'm curious how the vintage Color Skopar would perform, but unfortunately, this copy came with a misaligned rangefinder and requires attention. 

I guess I'll have to wait to have some pictures from this camera. In the meantime, here's a video I made to showcase the workings of the Vitessa:


Tuesday 6 October 2015

An Introduction to Film Developers Part I

Part of the joy of black and white film photography is experimenting with the various combinations of different developers and film to accomplish varying effects. Just like how an artist chooses his medium to best execute his work, a photographer also chooses the right combination of developer and film to best represent the image he has in mind.

Film and Developer Combinations

Choosing a film developer for the first timer can be very daunting, especially with the number of developers in the market, but not necessary. As a general guideline, you may adhere to the following:

  • If you want to emphasise minute detail, use a high definition developer.
  • To cope with extremes of contrast, a compensating developer can help.
  • To boost the contrast of a flat object, use a energetic developer.
  • For maximum economy, use a universal developer.
  • If maximum quality even in broad areas of mid-tones is desired, a fine-grain developer can be used.
  • For convenience, use a monobath.

Certain developers are created specifically for films from the same manufacturer. By adhering to the instructions given by the manufacturer, specific and consistent results can be achieved. A good combination to start is Kodak Tri-X and D-76 for 9.5mins (1+1 Dilution) as it is very forgiving.

It is very tempting to try out different combinations at the start of your photographic journey but I strongly recommend getting really acquainted with one film and developer combination before moving on to the next. This will help grow the habit of consistency and help you troubleshoot a negative if required. (Future article - Negative Troubleshooting)

Once you are ready to try out other combinations, Digital Truth maintains a database called the Massive Dev Chart which has a large list of user submitted times for various developer and film combinations.

For more in depth information on how the components of developers and how you can mix your own, read An Introduction to Film Developers Part II.


TUTORIAL: Understanding and Shooting Infrared BW Film.


Hasselblad 501c + Distagon 50mm,
Hoya R72 Filter and Rollei IR Film
Introduction

As every photographer would know, our senses strongly shape the way we perceive the world, but they only sample a small part of the reality around us.

Curiosity around the world beyond natural perception has motivated some of our greatest inventions and discoveries. Since the 17th century, telescopes and microscopes have extended the reach of human vision to ever larger and smaller scales. In the last two centuries, visual observation escaped not only the human scale, but also the visible spectrum.


Light Spectrum Chart


The world seen in infrared is once familiar and strange. Even though we cannot see infrared, it is always there. One can achieve incredible and dramatic photographs using infrared film. But because shooting infrared can be intimidating, many photographers avoid it. However, having a proper understanding of infrared film and how to handle it eases its use dramatically. In this post, I'll examine the differences in various infrared films, what kinds of results you can get with a variety of filters, and how to handle the film after shooting.


Panchromatic vs. Infrared

Normal panchromatic films are designed to render images as close to our vision. While using coloured filters can allow the photographer to manipulate the tonal quality of the photograph, what gives IR film its main characteristic, and what makes it different from conventional film is its ability to record reflected infrared energy.

The largest natural source of infrared radiation is the sun. Because chlorophyll reflects high levels of infrared energy during photosynthesis, it causes leaves to record as white to light grey in infrared images. This 'effect' of infrared film is most obvious in foliage and often exploited by IR photographers.


Film Choices

There are several types of infrared film in the market and choosing the one with the appropriate IR sensitivity is important for achieving the look you desire.

Rollei Infrared 400
  • True IR sensitivity - Up to 820Nm
  • High sensitivity - ISO 400
  • Fine grain high contrast
  • Loading possible in subdued light
Illford SFX 200
  • Near IR sensitivity - Up to 740Nm
  • No extra precautions needed for loading film
  • Full panchromatic sensitivity without filter
  • Easily available
Kodak HIE
  • Highest IR sensitivity - Up to 900Nm
  • No anti-halation layer
  • Discontinued
  • Must be loaded in absolute darkness

Filters

The use of a filter is required to bring out the sensitivity of the film to red light. If you were to use an infrared sensitive film without any filter, you can expect a normal black and white photo. There are a variety of filters for IR film and depending on the film you use, some may work better for your film.

Coloured Filters
  • #8 Yellow - begins transmitting light at 450Nm, blocking ultraviolet and most blue light.
  • #15 Orange - begins transmitting at 500Nm, blocking all ultraviolet and blue light.
  • #25 Red - begins transmitting at 600Nm, blocking ultraviolet, blue, green and yellow.
Opaque Filters
  • #89B filter begins transmitting at 720Nm
  • #88A filter at 750Nm
  • #87 filter at 800Nm
  • #87C filter at 850Nm

Some photographers prefer to use a deep red filter like the #25 used normally for normal black and white film as it still allows some visible light to pass through, allowing them to frame the shot in the viewfinder while the filter is on. However, I recommend the use of Opaque filters like the #89b as it only allows infrared light to pass, creating a more dramatic IR effect.


Metering

Due the amount of light being blocked by the filters, appropriate compensation must be applied order to get correct exposure. While there is no hard and fast rule for the amount of compensation required, you may refer to the following table as a starting point:

Filter Type Compensation
#8 Yellow
0.5 - 1 Stop
#15 Orange
1 - 2 Stop
# 25 Red
3 - 4 Stop
# 89B
4 - 6 Stop

In the initial stages of shooting infrared, it may be useful to burn some extra film by bracketing -1 and +1 stop to see how exposure affects the final image. You might need to compensate more when exposing a scene with bright direct sunlight and less with diffused light. With experience, you will be able to find out which exposure value works best for you.


Developing IR film

You may develop IR film just like any other regular black and white film. I generally develop my Rollei IR in HC-110 Dil B for 9 minutes.


Other Considerations

Because of their increased sensitivity, it is important to store your infrared films in a dry, cool and dark environment or there will be a risk of fogging. I keep mine in a dedicated film freezer, taking it out a day before I shoot the film for it to cool down to room temperature.

When choosing a camera to shoot IR film, take note of unexpected fogging and or leaks caused by film windows and camera imprints. To remedy this, tape a piece of aluminium foil to the film window and turn off any imprints. As such, it may be impossible to use cameras such as the older Rolleicords and Zeiss Ikontas due to their reliance on the windows for advance.

Wednesday 9 April 2014

RAW vs JPG: What do I shoot with?

You have probably heard your friends tell you to shoot your photos in RAW. They are bigger in size and are therefore 'better' than JPEGs. But just how much better is RAW compared to JPEG? This post aims to examine the benefits of shooting RAW vs JPEG by looking at real life comparisons.

1. What is RAW?

A digital RAW file, as the name implies, is a file containing the unprocessed raw data as captured by a camera's digital sensor. Each camera manufacturer uses a proprietary RAW format with the exception of Adobe's DNG. A RAW file does not contain a finished photograph. For those who have shot film, a RAW file is best described as a 'digital negative'. A final image can only be obtained through post-processing in a RAW conversion software, just like how one would spend time in the darkroom printing an image from a negative.

--

2. The Advantage of RAW.

When compared to JPEGs, RAW files have a significant advantage over the latter:

i. NO LOST DATA. 

JPEGs are convenient to work with due to its small file size. In order to obtain it's small file size, a compression algorithm is applied to the image causing a certain amount of data in a JPEG file to be truncated. As such, JPEG files are 'lossy' files, the more the file is compressed, the more detail it loses.


Rollover to see the difference between JPEG compressions.

It is useful to note that although a JPEG may look fine the first time it is opened, it starts to show degradation in quality if it is opened and saved repetitively. The picture below shows the degradation process after repetitive saves using JPEG Medium.


Degradation starts from the first save. By the 5th save, degradation is significant.

The RAW file on the other hand is not compressed and does not lose data. When photographers work with RAW, they often save their images as a TIFF or a PSD (Adobe Photoshop) file. These formats preserve image quality and lose no data irrespective of the number of times they are opened and saved. As such, we call them 'loss-less' formats.

---

ii. CONTROL OF DATA.

When shooting in the JPEG format, an in-camera software programmed to convert raw data from the sensor into an image according the existing settings when the picture is made. During this process, the in-camera software, not the photographer, applies picture settings such as exposure, contrast, sharpening, saturation, white balance, etc. in an attempt to create a picture that is deemed 'acceptable' by the software. The original raw data captured by the sensor is altered, and is no longer available.

In a RAW file, camera settings for color space, sharpness, saturation, and white balance are not applied to the image. Instead, they are tags which accompany the RAW file through the conversion process, allowing the photographer to process all of the original data on a desktop or laptop computer which has considerably more speed and power than the camera software. This allows for more flexibility in post-processing and to a certain degree, exposure, just as though as making those changes while taking the picture. Furthermore, the raw data is converted on the photographers' computer where they can view these changes real time.

Also, the photographer is always free to return to the RAW file to change settings and process the photo differently if an occasion rises because the raw data is untouched and does not alter underlying data.

Adobe Camera Raw importing an image into Photoshop.

(Insert image comparing post processing in RAW and JPG changing the white balance.)


---

iii. BIT DEPTH

To understand the advantage of RAW over JPEG, it is good to have a grasp of bit depth. Without going into too much detail, a bit is the smallest unit of data. It can be either 0 or 1, black or white, on or off. A byte is comprised of 8 bits and therefore can represent 256 different states (2^8). In summary, the higher the bit rate, the higher the number of possible states can be represented.

So how does bit depth correlate with RAW and JPEG files? The answer is simple.

JPEGs are 8 bit files, and most RAW files are 12 or 14 bit. An 8 bit file can measure 256 tonal values in each of the three color channels, or a total of 16.7 million possible colors per pixel. A 12 bit RAW file, however, can measure 4,096 tonal values per channel, or a total of 68.7 billion possible colors per pixel.

A JPEG file, therefore, records much less tonal data than a RAW. Consequently, the tonal gradations in a JPEG file are sometimes not smooth, a condition referred to as "posterization". It often occurs in areas of the sky where the change in tones is very gradual and subtle. Tonal transitions are much smoother, and image detail is more accurate in RAW files which discern many more color tones per pixel than a JPEG.

(Insert example of posterization)

When processing a RAW file, it is recommended to save in a TIFF or Photoshop PSD or any file format that supports 16 bit. This way, all the data will not be lost even when opened, closed, or compressed.

---

3. Conclusion.

The choice of shooting JPEG and RAW is ultimately decided by you as a photographer and what you wish to do with your images. If you are doing snapshots to email to your friends or posting on Facebook and Instagram, the smaller file size offered by a JPEG might be ideal.

At this juncture, it is useful to note that despite the advantages of RAW, an image captured with JPEG in the maximum quality, a good color print can be obtained, assuming that all color settings and exposure was done right in the camera.

On the other hand, if you are a working photographer or just enjoy post-processing your photos, the flexibility of what a RAW file offers is definitely appealing. RAW files are larger than JPEGs and thus take up more space on the hard drive, but their advantage can be significant.

If you are after valuable hard to find images, or if you want to reproduce your work in the highest possible quality, then the RAW format would almost be mandatory. The RAW file records so many more colors and tonal variations than a JPEG. As a result, prints reveal more detail, have smoother tonal gradations, and avoid "posterization" which is sometimes found in JPEGs.

When in doubt to which file format to shoot with, most modern cameras allow the photographer to record both in JPEG and RAW simultaneously. With a little more file space, one can have the best of both worlds.